
Hey there, fellow internet surfer! You’ve probably noticed that sometimes our trusty old Google Chrome can hit a bit of a speed bump, right? No worries; it happens to the best of our ability. But fear not—I’ve got some nifty tricks up my sleeve to get your Chrome back in the fast lane. Let’s dive right in!
How to Fix Slow Chrome Speed?
Method 1: Clear the Cache and Cookies
Think of cache and cookies like the clutter that accumulates in your browser’s attic over time. Sure, they help load pages faster initially, but when they pile up, they can slow things down. Here’s how to give ’em the boot:
1) Fire up Google Chrome

2) Hit those three little dots up in the right-hand corner.
3) Click on “Settings.”
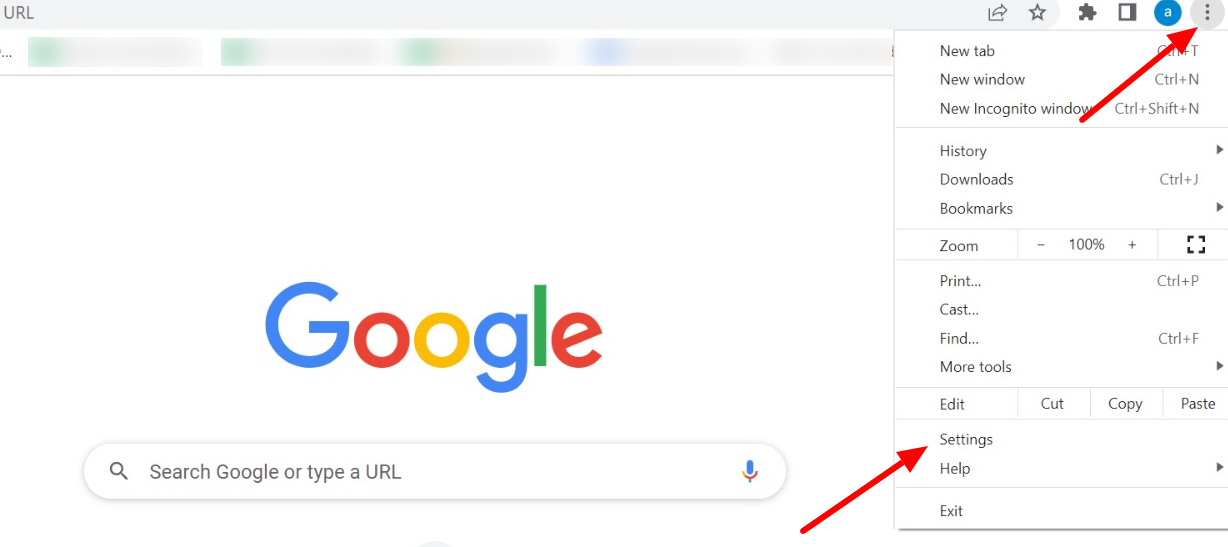
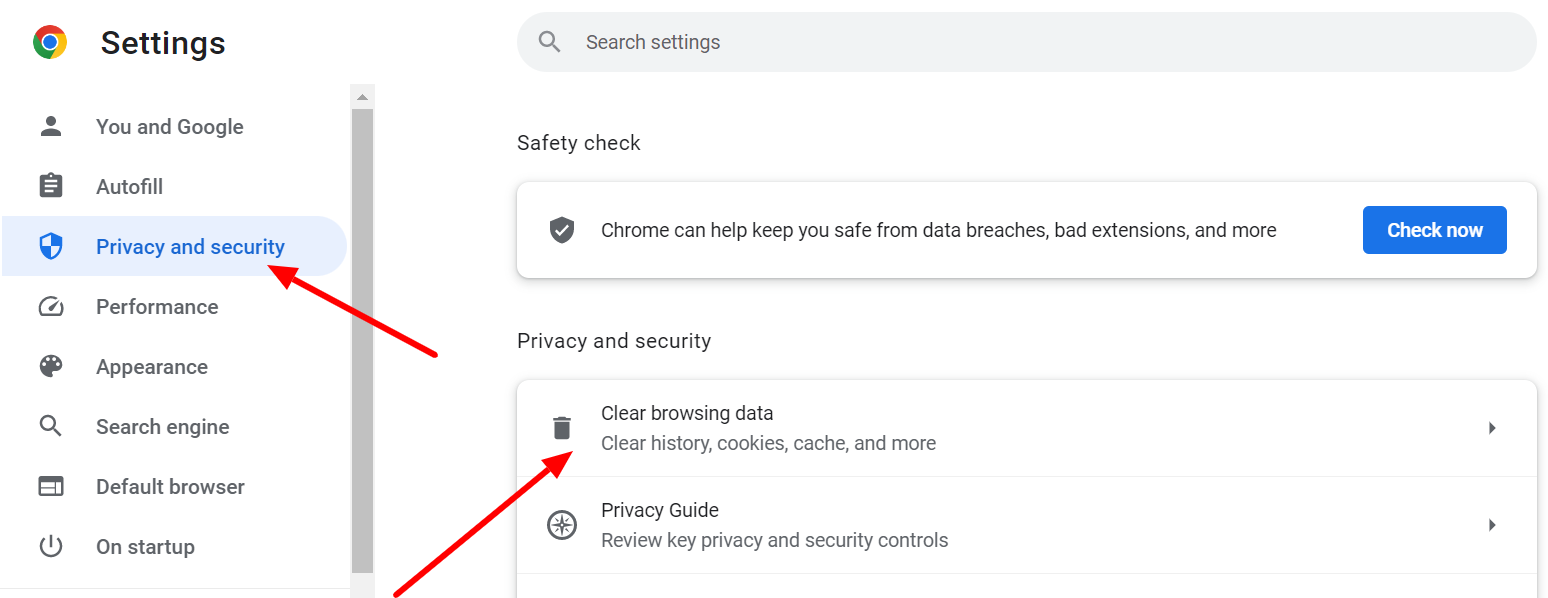
4) Scroll down and give “Privacy and security” a tap.
5) Now, hit “Clear browsing data.”
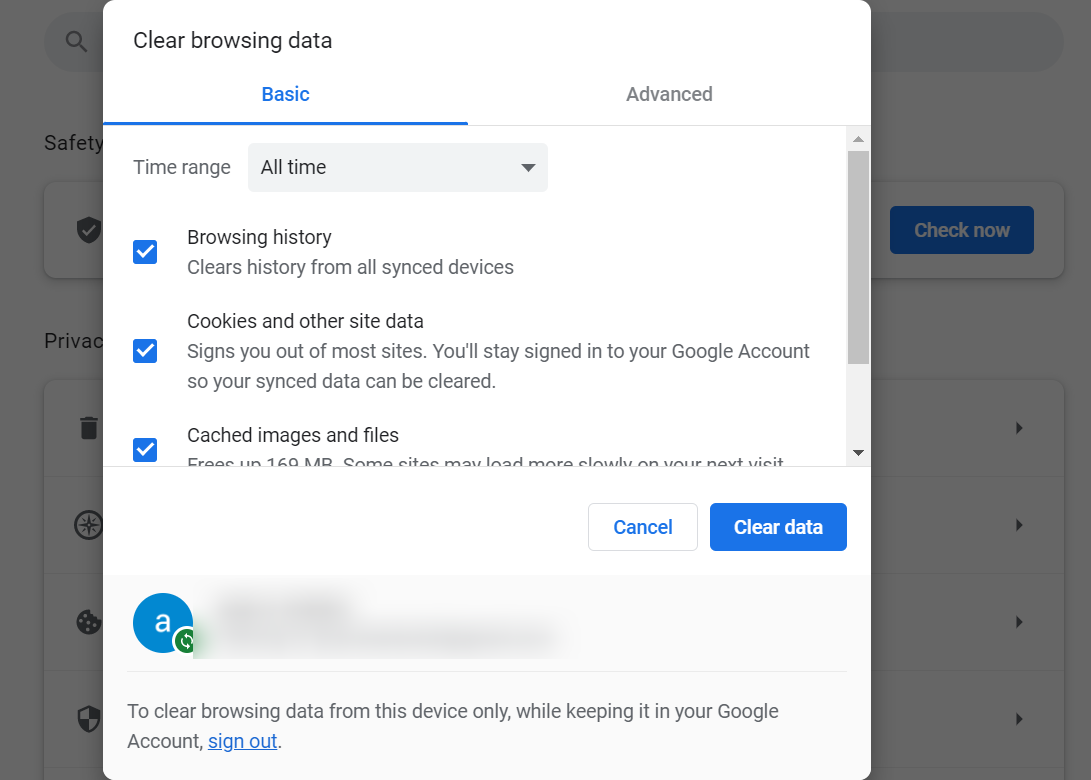
6) Make sure “All time” is selected in the dropdown menu.
7) Check off “Cookies and other site data” and “Cached images and files.”
8) Last step: click “Clear data” and voila!
Method 2: Disable Browser Extensions
Ah, extensions are the cool little add-ons that make Chrome even more awesome. But hey, too many cooks can spoil the broth, right? Here’s how to clean the house:
- Open up Chrome.
- Click on those trusty three dots again.
- This time, hover over “More tools.”
- Click on “Extensions.”
- Now, it’s time for some spring cleaning! To disable any extensions you’re not using, flip the toggle switch next to them.
Method 3: Update Google Chrome
Just like your car needs a tune-up every now and then, Chrome needs some love, too. Luckily, Google’s on it. Here’s how to keep your browser running smoothly:
- Launch Chrome.
- Hit those three dots once more.
- Select “Settings.”
- Click on “About Chrome”
- If there’s an update waiting, hit “Update” and let Chrome do its thing.
Method 4: Disable Hardware Acceleration
Now, hardware acceleration can be like a turbo boost for your browser, but sometimes it can be a bit too much. Here’s how to find the right balance:
- Open Chrome.
- Yep, you guessed it, click on those dots.
- Select “Settings”
- Scroll down and click “Advanced.”
- Under “System,” toggle off “Use hardware acceleration when available.”
Method 5: Reset Google Chrome:
Sometimes, you just gotta hit the reset button, right? Here’s how to give Chrome a fresh start:
- Fire up Chrome.
- Click on the trusty dots yet again.
- Select “Settings”
- Scroll down and click on “Advanced.”
- Now, click on “Reset and clean up.”
- Hit “Restore settings to their original defaults.”
- Last step: click “Reset settings” and watch Chrome get its groove back.
Conclusion: Fix the Slow Google Chrome
So there you have it, folks! No need to stress when Chrome starts acting sluggish. Just follow these five simple tricks, and you’ll be back to cruising the web at warp speed in no time. Happy browsing!
Further Read:
- How to Fix the Android System WebView Won’t Update Issue?
- How to Block or Enable JavaScript on Chrome for Android
- 7 Best Apps to Trim Video for Android & Phone
- Google Snake Hack
FAQs
Why does Chrome on my laptop run slow?
Chrome will be slow if you have many tabs open, your browser isn’t up-to-date, or you have many cookies. Additionally, your internet service provider (ISP) may negatively impact Chrome’s performance if they throttle your connection.
How can I speed up the browser on my laptop?
Simple troubleshooting steps include manually updating the browser, cleaning the cache and cookies, restarting the browser, removing or deactivating extensions, and closing any tabs that aren’t needed to speed up the browser.
Why is my desktop browser slow?
Automatic software updates and other background tasks can eat up your CPU and RAM, making web browsing sluggish. Similarly, if you have a lot of tabs open, your system will use more resources, which will slow it down.