Following the most recent best practices, Claiming Your Website on Pinterest is one of them, for Pinterest marketing is essential to increasing website traffic. One of the most crucial things you can do to set up a Pinterest traffic strategy that works is to claim your website.
But how exactly do you go about claiming your website on Pinterest? I was wondering what the process was to have your website verified on Pinterest.
You want to claim your website on Pinterest but don’t want to get bogged down in the details; Quick and easy steps to claim your Pinterest website in under 5 minutes. So, Let’s dive in.
What exactly does “claiming your website on Pinterest” mean?
Claiming your website on Pinterest is a good idea if you’re just starting. What does it mean to “claim” your website on Pinterest? Simply put, “claiming” your site is how you confirm to Pinterest that you are the rightful owner of the domain in question.
No one else could claim your website if they didn’t have access to the administrative area, right? Once you’ve “claimed” a website, all pins associated with its domain name and URL will be attributed to you on Pinterest.
To sum up, your Pinterest account will be credited for any pins that include your domain name.
Why is it essential to Claim your website on Pinterest?
Although it can seem like a waste of time at first, claiming your website on Pinterest is a vital step before you can begin marketing on the platform.
If you already have a website, why must you claim it?
The whole URL of your website will be displayed at the very top of your Pinterest profile, which is a huge plus. The clickable URL lets People easily access your website to learn more about you and how you can help them.
Claiming your website also grants you access to Pinterest Analytics, allowing you to follow your progress and performance more efficiently. This is a must-have resource for any blogger wanting to increase their blog’s Pinterest traffic.
After you verify your site, Pinterest will provide you with comprehensive analytics.

At long last, your account supports rich pins! By incorporating a call to action and additional content into your pins, you can add more value to your audience.
What you’ll need to follow this detailed guide
Here are three things you’ll need before you can follow my tutorial on claiming your website on Pinterest:
Site or blog built on the WordPress platform
In this short guide, I’ll explain how to link your WordPress site to Pinterest. Therefore, this is not the correct guide for you if you don’t already have a WordPress website or blog.
I’ve put together a free, no-nonsense guide for those who have never had a blog before on how to set up a WordPress blog. Look at this!
Yoast SEO Plugin for WordPress
You will need the WordPress content management system and the Yoast Search Engine Optimization plugin (both free) to follow along with this guide.
Claiming your website on Pinterest requires inserting a tiny bit of code. I suggest the Yoast SEO plugin for those who find such discussion intimidating. It simplifies things dramatically.
A Pinterest account for your company/brand
At long last, a Pinterest business account is a must, Creating a Pinterest business account is free of charge and provides access to valuable tools like Pinterest Analytics for boosting website traffic.
There are two ways to open a business account.
- Start a brand new business account Right Here.
- You can transform your existing personal account into a professional one.
Creating a Pinterest business account is the first step in implementing Pinterest marketing strategies for your blog.
A comprehensive guide on how to claim your website on Pinterest
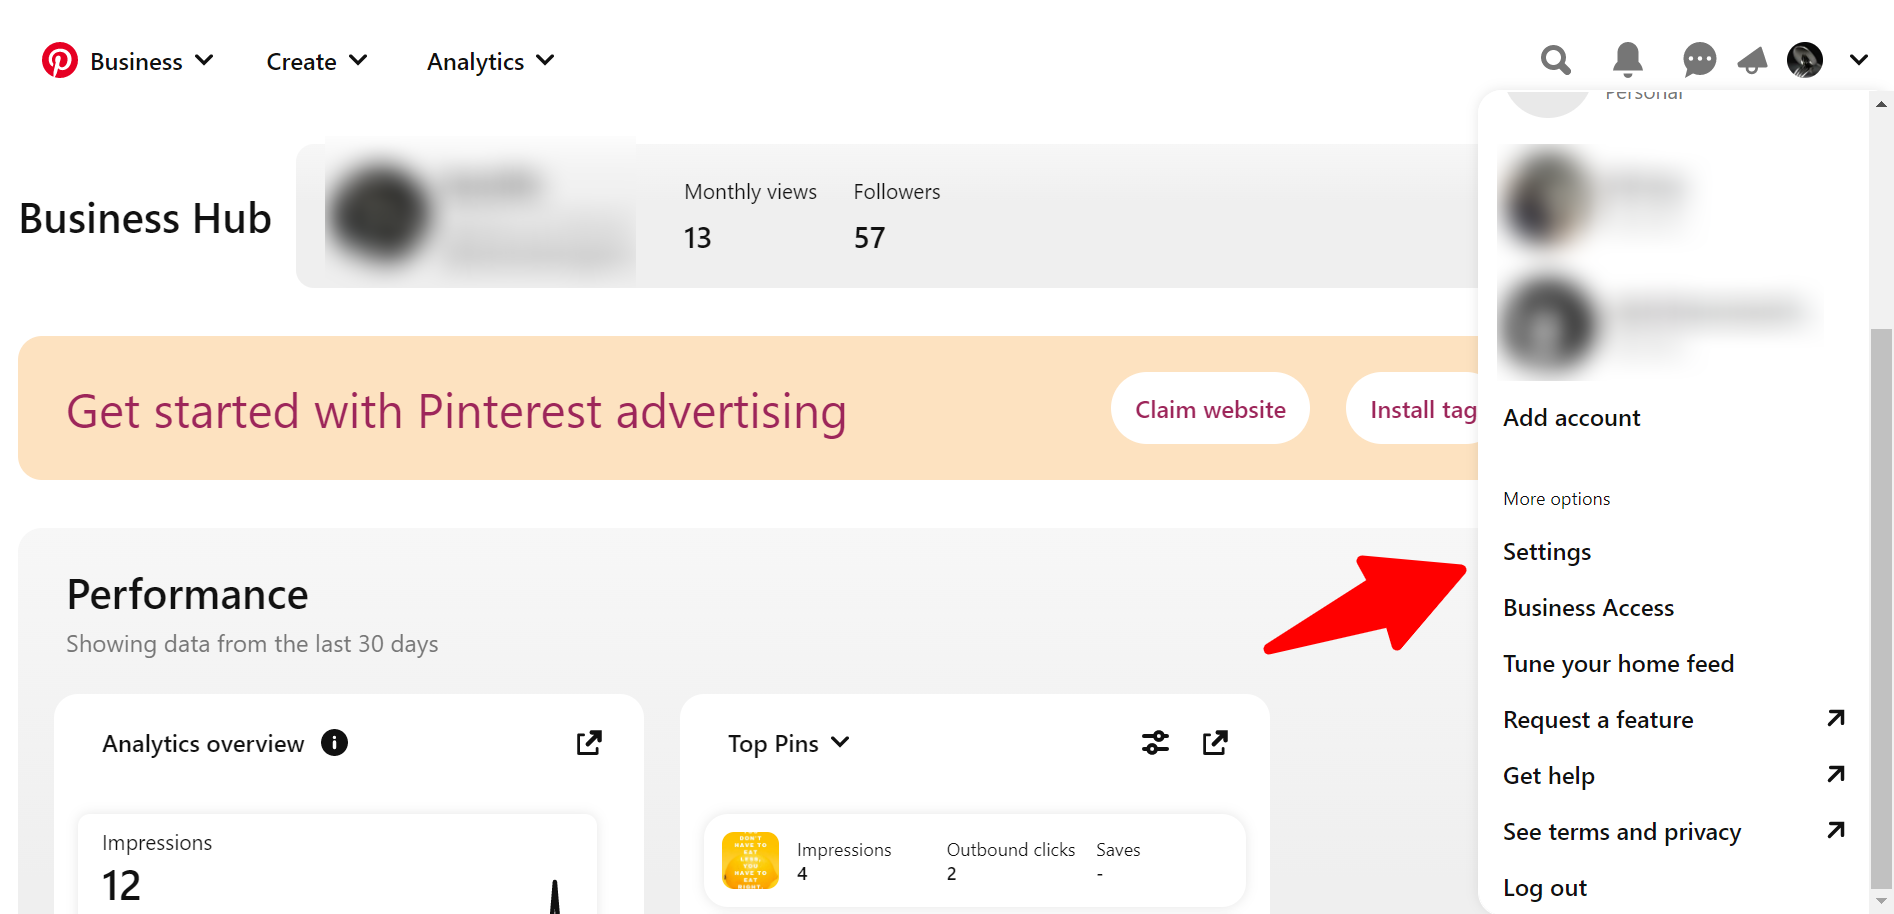
1. First, go to your Pinterest Account Settings
Ensure you’re working on a computer to transfer content between Pinterest and WordPress.
Make sure you’re logged into the correct Pinterest account before proceeding. Open the menu in the top right and click Settings to access your Pinterest account preferences. The fundamentals of Pinterest marketing for bloggers: adjusting your profile settings
2. Go to the “Claim” section of your account’s settings
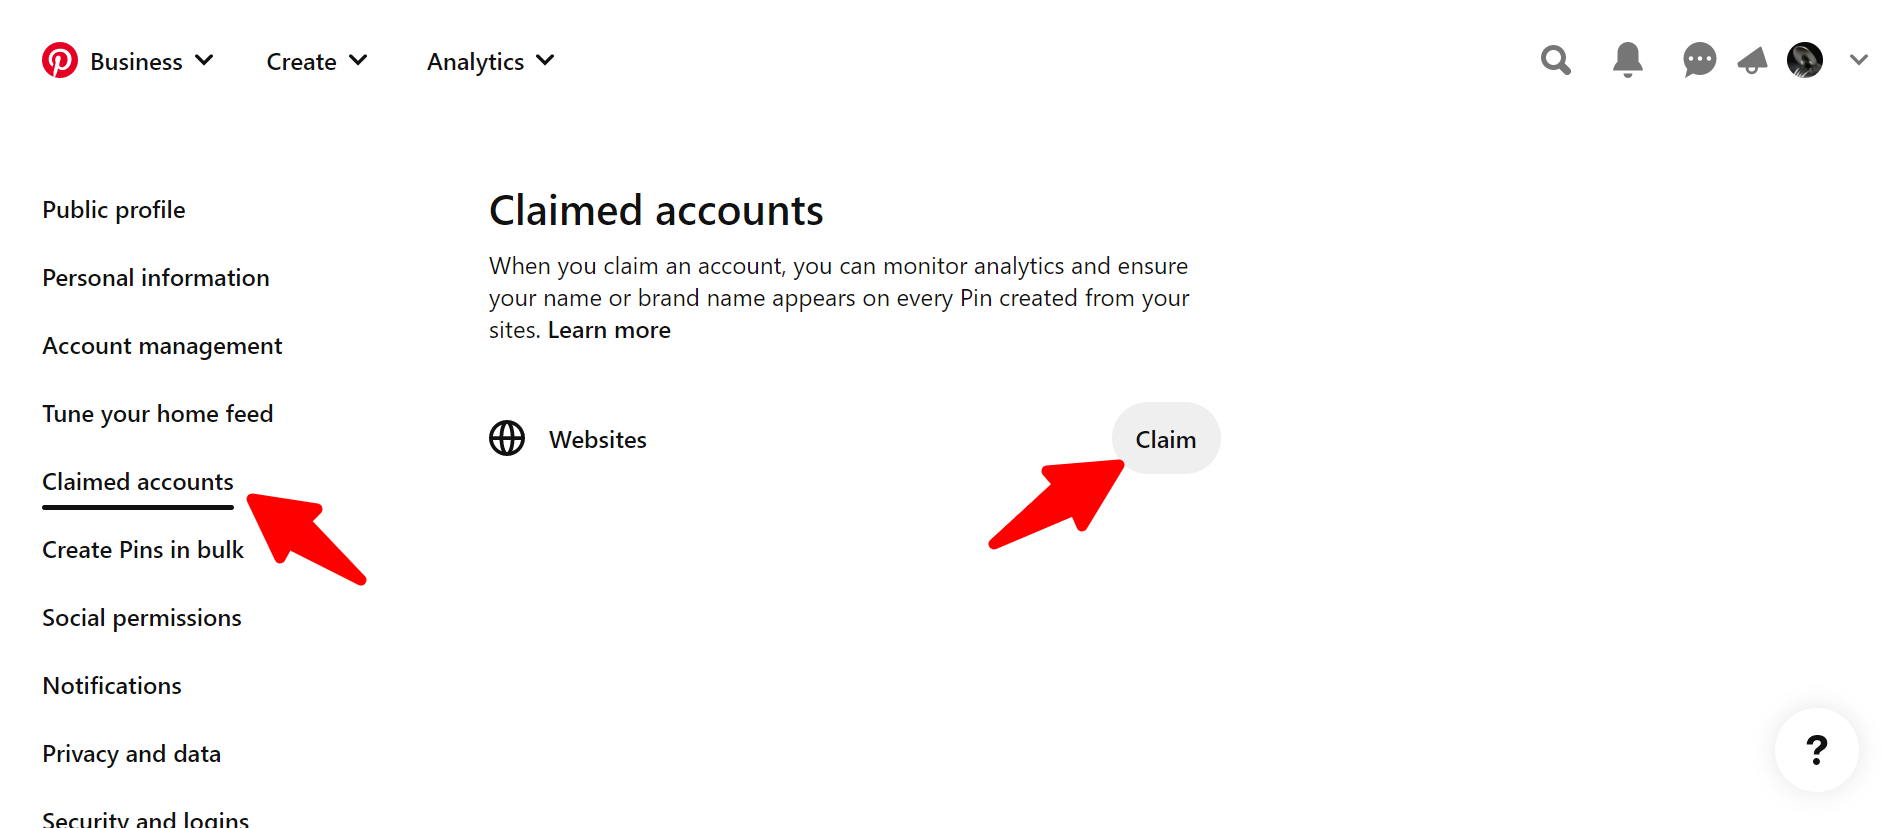
Next, select Claim from the menu on the left to access the configuration options; find the Websites area and select the grey Claim button on the right, as we are claiming your website. Taking ownership of your website via Pinterest’s settings, Go to Claim > Websites > Claim to view your website claim options.
3. Select Claiming Method
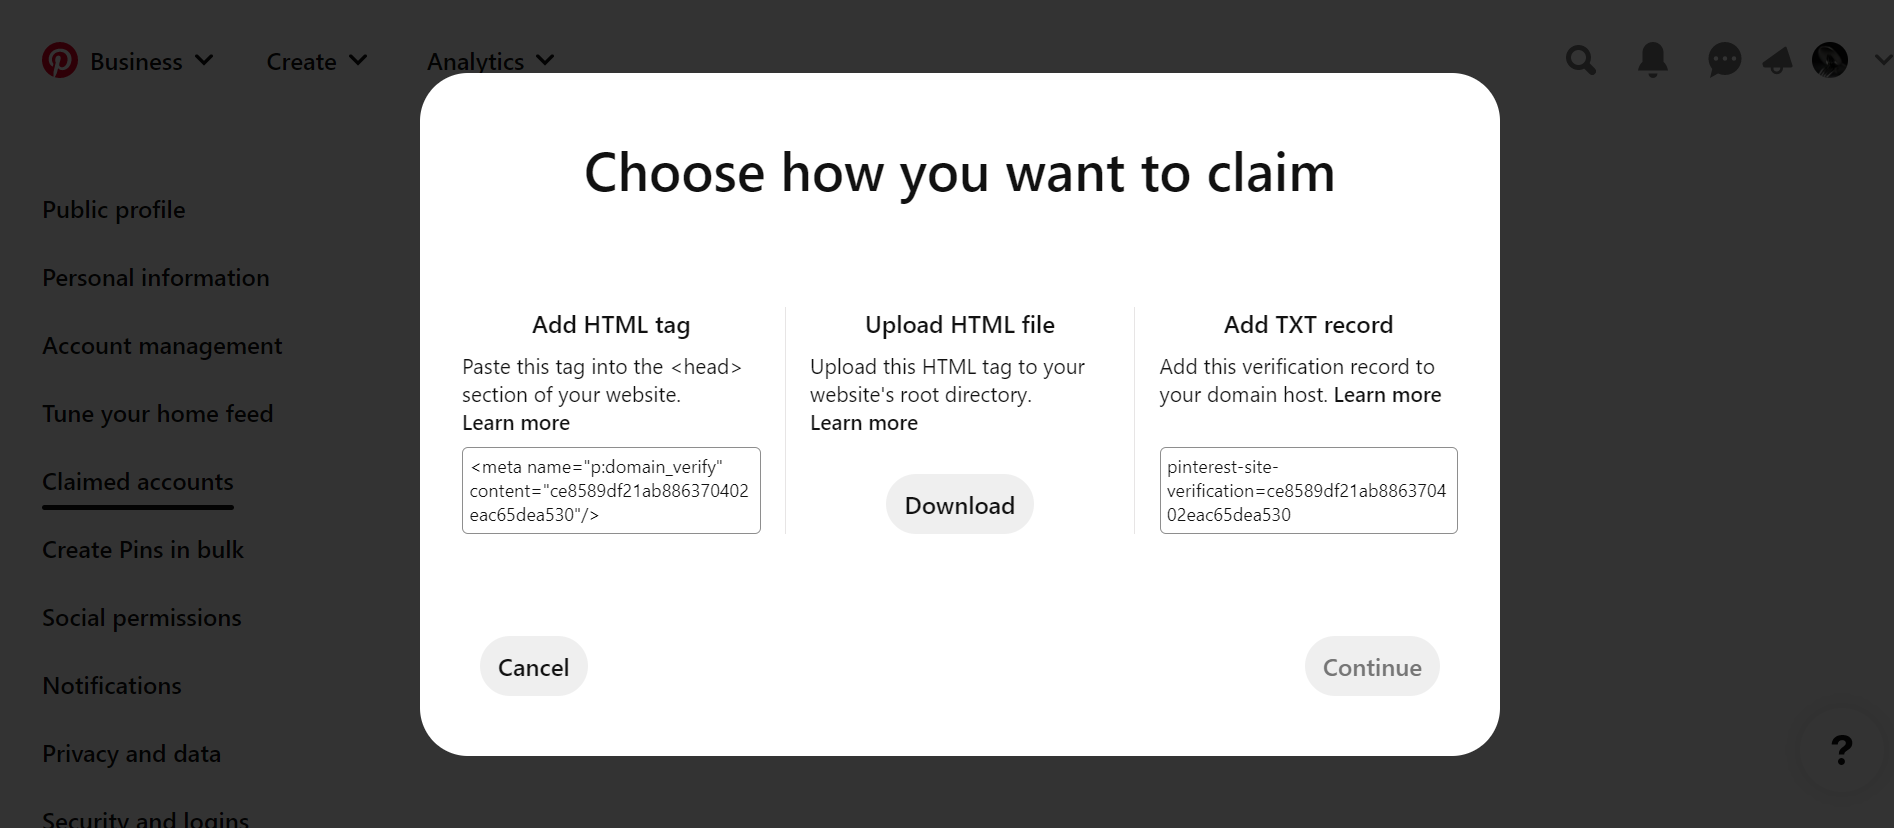
Now, a little window will open up, and you’ll have three choices for claiming your website:
- Make use of an HTML tag
- Send in your HTML file
- Create a text file.
Pick the Pinterest website verification method that best fits your needs. You can claim your Pinterest account in one of three ways: with an HTML tag, an HTML file, or a TXT record in your domain host’s control panel.
These may appear really esoteric and technical, but rest assured, they are not. The manner of claiming on the far left will be replicated in HTML.
Put your cursor in the text box, right-click to copy the meta tag, and then hit Continue at the bottom right.
With a mouse click, you may copy the HTML tag, and then you can click the Next button to proceed; we’ll return to the window where you typed in your website’s URL for verification shortly. Claiming your Pinterest profile by verifying your website’s URL.
4. Paste Meta Tag into Yoast SEO
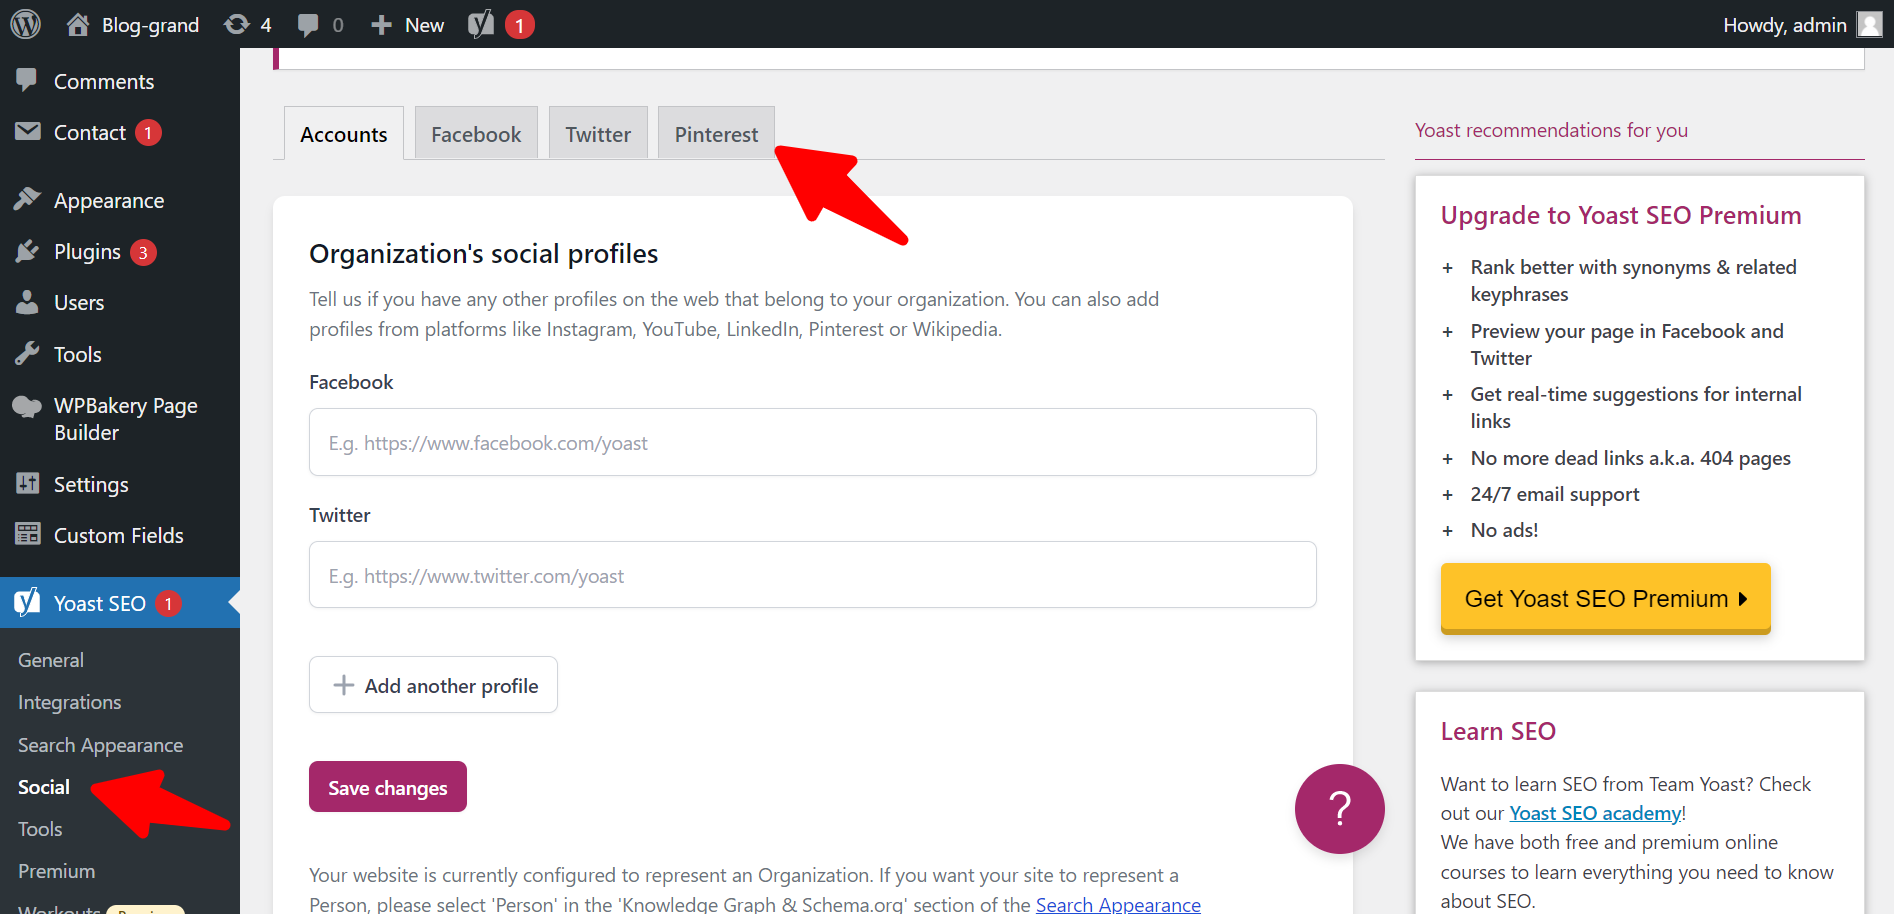
Copy your meta tag, then go to your WordPress dashboard via a new tab in your browser. Make sure the free Yoast SEO plugin is installed and activated. Insert your HTML tag into the “Pinterest confirmation” section in Yoast SEO > Social > Pinterest.
Yoast SEO plugin: Pin It button placement for adding a Pinterest meta tag. To add your HTML pinboard element to the Yoast SEO plugin, go to Settings > SEO > Social > Pinterest. To finish, select Save Modifications.
Note: Once you’ve saved your modifications, you can only view the meta tag, a string of letters and numbers. Don’t freak out if it looks different than the code you typed into the field; this is normal.
Also, Read:
- Best Pinterest Tools
- Best Pinterest Chrome Extensions
- How to Unblock Someone on Pinterest
- Best Pinterest Proxies
- How to Logout of Pinterest?
5. Double-check your claimed website on Pinterest
Finally, revisit Pinterest. The window labeled “Verify” should still be accessible. Submit your domain name or website address and click the Verify button. To complete your Pinterest website claim, enter your website URL and click the Verify button.
When prompted, enter your website’s URL into the verification window and click the Verify button to complete the claim. Your HTML meta element will now be validated by Pinterest. If Pinterest approves your website’s claim, you will receive a confirmation email.
(See? I told you it was simple!)
